Jun 7, 2010

Tobacco Plants, Nicotiana tabacum

I sowed some Nicotiana tabacum seeds that I brought from trademe. The seeds were organically grown in NZ so they are acclimatised to this environment. This could account for the success of the germination rate! As with the poppies I have had a massive surplus of plants & therefore I have chosen the most successful plants to be planted out.

I greatly underestimated the size of the tobacco leaves! I thought that a 10cm soil bag would be enough space for the plants. It is now clearly visible that they are going to become very root bound. However I have no other way to grow them due to the lack of space. I am treating this grow as an experiment. I have no way of harvesting & using the tobacco as this requires a lengthy Curing process. I would need to build a special unit/room for this process. I would love to do this in the future sometime.

Here are some pics of my shabby crops. The tobacco plants are in the black soil bags (with the F-OFF sized leaves):


The leaves have also taken a battering from some bastard caterpillars since I planted them out! I was convinced that the tobacco plant deterred almost all pests! Perhaps that is just with the wild version Nicotiana rustica

Opium poppy (Papaver somniferum)

I brought some Poppy seeds from the trademe site a couple of months ago. I had always intended to grow poppies, but I was going to wait until spring to plant them out. However I heard that in NZ many farmers sow seeds in Autumn as the weather is still warm enough to germinate sub-tropical species & the winters don't get dangerously cold (no frost). This method allows the plants to slowly establish themselves over winter so they can really benefit from the Spring & Summer conditions & push out some higher crop yields.

I followed a brief poppy growing guide I found on the internet (Species Short Track), but due to limited space I was forced to sow the seeds across 8 large plant pots I brought. They germinated readily and filled the surface of all of the pots! I have to say they were Very Successful! I have been systematically picking out the smaller plants & will continue doing so until I am left with 1-2 plants in each pot.

Here are some pics:


Unfortunately I have a distinct Lack of space to grow these plants in. Ideally I would have a small plot set out for them! At the moment I'll have to make do with the sunniest corner of my tiny garden!

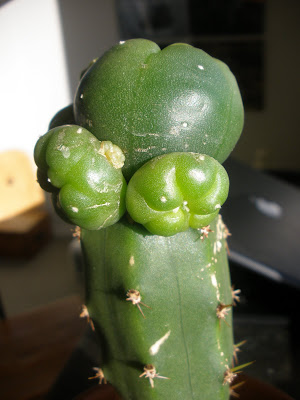
Pilosocereus Azureus & New Peyote Graft

The first time I tried to graft onto this huge Pilosocereus Azureus the join between the Scion & rootstock quickly developed a mould which spread through and ultimately killed the Peyote. The weather was partially humid at the time which probably promoted the mould.

However I moved on and attempted a re-graft a few weeks later when the weather was less moist. I have no idea exactly when I grafted this Lophophora Williamsii Var. Caespitosa but it must be about 2 months old by now. It was a small pup from my mother Var. Caespitosa. It took a while to show signs of the graft taking but it eventually plumped up!

I have taken it inside for the winter to make sure it doesn't develop a mould again. Also to protect it from the overly curious wildlife!

Here are some pics:


I was hoping that the size of the rootstock will cause the Scion to show greater growth (this is what i've heard). But as this graft was done late in the season I think I'll need to wait for spring to see whether this is the case!


You will have to take my word for it as I have no pictures to compare, But this graft has shown some quite significant growth. The scared tissue around the sides of the Peyote used to cover the whole thing! All of the green tissue is New Growth!


This button was showing some significant pupping before it was grafted so I am expecting to see some Extreme Pupping!


Unfortunately it looks like a bird of some sort got too curious & took a couple of hearty pecks out of my poor Peyote!

Jun 6, 2010

Salvia Divinorum Bush!

I planted my Salvia clone on the 16/02/10. It was a veritable twig for quite a while & I had my doubts if it would make it! But it seems with Salvia that the harder they fall - they harder they will come back! This this has grown to an epic bush in the 4 months I have had it! I have even begun to take my own clones off it (two so far).

Here is a few pictures:


Here is a picture of how it looked after 10 days of being planted out.

16/02/10

Lophophora Williamsii Seedlings

These seedlings were sown on the 14/11/09 so they are now 7.5 months old. As with the Trichocereus seedlings they have been deprived of regular watering over the past couple of months, so they are not as well developed as they could be! They have grown to 1+cm now though and all are ready to be grafted! I do intend to leave several as they are though as they are just so cute.


Here they are on the 9/12/09 at roughly 1 month old.


9/12/09

Here is an image of some seedlings at 2.5 months old, 7/01/10


7/01/10

Here they are on the 7/06/10 at 7.5 months old.

7/06/10

I will grow some more seedlings soon as I have found these to be very satisfying to grow!

Trichocereus Bridgesii & Trichocereus Peruvianus Seedlings

These seedlings are were sown 4/11/09 so are now just over 8 months old. They have been slightly neglected in terms of getting regular watering which is why they are still rather small. Next season I am sure they will pick up the slack (as long as I do too!). Originally I planted out 20 T. Bridgesii & 50 T. Peruvianus seeds into clear row so that they could be differentiated. However my dad accidentally tipped the whole lot of seedlings all over the floor! I rescued as many as I could but as they were still tiny & fragile seedlings so many were lost. They were also mixed between the two species.


Despite the mixing of the two species mentioned above - it is now clear to see the difference between the two. This image shows a T. Peruvianus on the left and a T. Bridgesii on the right.


Seedling tray on the 7/06/10.


Seedling tray on the 4/11/09.

Trichocereus Bridgesii Seedling (Echinopsis lageniformis)

This was the first cactus seedling I ever sowed! It was also my first post on this blog! So this is a special little guy. I've had this seedling since sometime in November 09 so it is around 8 months old now. It actually looks like a cactus now! Its been growing under a makeshift water-bottle humidity dome on my windowsill. It is now fully acclimatised to the outside humidity.


Its still the cutest little thing despite its spines.


Here is a picture of how it looked in December 09 around a month old.

Pereskiopsis Spathulata

I've had these since 22/03/10, so over 2 months now. They have shown some good growth & have rooted well. Unfortunately I'm not going to see incredible growth due to the lower light levels during the winter season. Hopefully they will grow enough for me to take some more clones of them & maybe even start some grafting in the spring!


I have another planted outside, I am going to compare the growth rate between the ones kept indoors & out to see which is more beneficial.

Mega Plant Update!

I haven't been keeping up to date with my blogging unfortunately. So this will be an update of almost all of my collection!
Its become winter here in NZ so things are starting to shut down. But unlike the UK the winters are mild and there is the occasional sunny day so some things are still growing (slowly).
I'll start with my windowsill cacti.

This Lophophora Williamsii var. Caespitosa graft was done on the 4/12/09, It is now just over 7 months old. It was my first attempt at grafting any cacti & I must say its gone brilliantly - beginners luck perhaps! Its grown to 3.5+cm in diameter & has sprouted 6 pups! Two of which are already <2cm!
Here are some pics:


Provocative!


Here you can see one of the pups pupping! Now that in an accomplishment!


Here is a pic of how it started out 2 weeks after it was first grafted:


This is some incredible growth for just 7 months! It hasn't even experienced a full NZ summer yet! I cannot wait to see the results for next year!